backup

Automating PostgreSQL Backups with Logging: A Complete Script for Cron Job Integration

make the script compatible with cron jobs and have it log each backup event, including any errors, you can modify the script to write to a log file. This will ensure that every time the backup script runs, it logs the event (success or failure) to a log file.

PostgreSQL Backup Script with Logging

Backup


#!/bin/bash

# Database credentials
DATABASE="DB NAME"
USERNAME="DB USERNAME"
PASSWORD="DB PASSWORD"
HOST="localhost"
PORT="5432"

# Directory to back up
SOURCE_DIR=/var/www/html/pwdwebsite/public_html/

# Target directory
TARGET_DIR=/home/websiteuser/backup/bak/

# Log file path
LOG_FILE=/home/websiteuser/backup/backup.log

# Output files
NOW=$(date +"%Y_%m_%d_%H_%M_%S")
DB_OUTPUT=$TARGET_DIR/db.$NOW.sql.gz
FILES_OUTPUT=$TARGET_DIR/files.$NOW.zip

# Export PostgreSQL password so it is not prompted
export PGPASSWORD=$PASSWORD

# Function to log messages
log_message() {
    echo "$(date +"%Y-%m-%d %H:%M:%S") : $1" >> $LOG_FILE
}

# Start backup log
log_message "Backup started."

# Back up files
if zip -r $FILES_OUTPUT $SOURCE_DIR >/dev/null 2>&1; then
    log_message "Files backup successful: $FILES_OUTPUT"
else
    log_message "Files backup failed."
fi

# Back up PostgreSQL database
if pg_dump -h $HOST -p $PORT -U $USERNAME -d $DATABASE | gzip > $DB_OUTPUT 2>/dev/null; then
    log_message "Database backup successful: $DB_OUTPUT"
else
    log_message "Database backup failed."
fi

# Unset the password variable for security
unset PGPASSWORD

# Remove files older than 5 days
if find $TARGET_DIR -type f -mtime +5 | xargs rm -f 2>/dev/null; then
    log_message "Old backups removed."
else
    log_message "Failed to remove old backups."
fi

# End backup log
log_message "Backup completed."

Explanation :

  1. Log File Path:
    • A log file (LOG_FILE=/home/websiteuser/backup/backup.log) is created. This file will store messages about each backup operation.
  2. Logging Function:
log_message() {
    echo "$(date +"%Y-%m-%d %H:%M:%S") : $1" >> $LOG_FILE
}

A function called log_message is created to handle the logging. It records the date and time along with the message passed to it and appends it to the log file.

Backing up Files:

if zip -r $FILES_OUTPUT $SOURCE_DIR >/dev/null 2>&1; then
    log_message "Files backup successful: $FILES_OUTPUT"
else
    log_message "Files backup failed."
fi
  • The zip command logs whether the file backup succeeded or failed.

Backing up the PostgreSQL Database:

if pg_dump -h $HOST -p $PORT -U $USERNAME -d $DATABASE | gzip > $DB_OUTPUT 2>/dev/null; then
    log_message "Database backup successful: $DB_OUTPUT"
else
    log_message "Database backup failed."
fi
  • Logs success or failure for the database backup.

Removing Old Files:

if find $TARGET_DIR -type f -mtime +5 | xargs rm -f 2>/dev/null; then
    log_message "Old backups removed."
else
    log_message "Failed to remove old backups."
fi
  • Logs success or failure when removing backups older than 5 days.

Ending the Backup:

log_message "Backup completed."
  • Logs the completion of the entire backup process.

Cron Job Compatibility:

  • In a cron job, output isn’t visible directly, so logging to a file ensures you can check later if the job ran correctly.
  • Redirecting command output (>/dev/null 2>&1) ensures that only logs are written to the log file without showing any command output on the terminal, which is important when running via cron.

Cron Job Setup

You can schedule this script to run regularly using a cron job. For example, to run the script every day at 2 AM:

  1. Open your crontab:
crontab -e

2. Add the following line to schedule the script to run at 2 AM every day:

0 2 * * * /path/to/your/backup_script.sh

Make sure to replace /path/to/your/backup_script.sh with the actual path to the script.

This will run the script daily, log the results in the specified log file, and ensure the backups are handled correctly.

redhat

Mastering Linux Server Administration: A Comprehensive Interview Guide to RHEL Certification and Linux Services like NIS, NFS, FTP, SAMBA, iptables, DNS, and DHCP

    Services

    RHEL Certification (Red Hat Enterprise Linux)

    RHEL Certification refers to the official certification provided by Red Hat for individuals who demonstrate their expertise in managing and administering Red Hat Enterprise Linux (RHEL) systems. It validates the skills required to effectively deploy and manage RHEL servers in enterprise environments. There are different levels of certification, such as RHCSA (Red Hat Certified System Administrator) and RHCE (Red Hat Certified Engineer), which cover various aspects of RHEL administration.

    NIS (Network Information Service)

    NIS, also known as Yellow Pages, is a distributed directory service used in Unix-like systems for centralized management of user accounts, groups, and other network information. NIS allows administrators to store user and group information on a central NIS server, which can then be accessed by client systems. It simplifies user management across multiple systems by providing a single source of authentication and authorization.

    NFS (Network File System)

    NFS is a protocol that allows remote file systems to be mounted over a network. It enables file sharing between systems, where a server exports certain directories and makes them available to client systems. NFS provides a transparent and efficient way to access remote files as if they were local. It is commonly used in Linux environments for sharing files and directories between servers and clients.

    FTP (File Transfer Protocol)

    FTP is a standard network protocol used for transferring files between a client and a server over a TCP/IP network. It provides a simple and reliable method for file transfer, allowing users to upload, download, and manage files on remote servers. FTP servers can be set up to enable anonymous access or require authentication for secure file transfers.

    SAMBA

    SAMBA is an open-source software suite that enables interoperability between Linux/Unix servers and Windows-based clients. It implements the SMB/CIFS protocol, allowing Linux servers to act as file and print servers for Windows systems. SAMBA provides seamless integration between Linux and Windows environments, enabling file sharing, printer sharing, and authentication across heterogeneous networks.

    iptables

    iptables is a user-space utility in Linux that allows administrators to configure the netfilter firewall, which is built into the Linux kernel. It provides a powerful framework for filtering network traffic, performing network address translation (NAT), and implementing packet manipulation. iptables is commonly used for securing Linux servers by defining rules to control incoming and outgoing network connections.

    DNS (Domain Name System)

    DNS is a distributed system that translates domain names (e.g., www.example.com) into IP addresses (e.g., 192.0.2.1). It acts as the internet’s phonebook, enabling users to access websites and services using human-readable domain names. DNS administration involves managing DNS servers, configuring zones, adding/modifying DNS records, and ensuring the proper resolution of domain names.

    DHCP (Dynamic Host Configuration Protocol)

    DHCP is a network protocol used to automatically assign IP addresses, along with other network configuration parameters, to devices on a network. DHCP administration involves configuring and managing DHCP servers to provide IP address allocation, lease management, and network settings distribution to client devices. It simplifies network administration by dynamically assigning IP addresses instead of requiring manual configuration on each device.

    These topics cover various aspects of Linux server administration and are essential for managing and maintaining Linux systems in enterprise environments.

    74626191-469d2400-5192-11ea-9a7d-352d043e1f8d

    A Step-by-Step Guide to Configuring GlusterFS for High-performance Storage

    Introduction

    In today’s data-driven world, efficient storage solutions are essential for managing large amounts of data. GlusterFS, an open-source distributed file system, offers a scalable and flexible solution for high-performance storage. This blog post will guide you through the step-by-step process of configuring GlusterFS, enabling you to harness its power to meet your storage needs effectively.

    GlusterFS

    Prerequisites

    Before we dive into the configuration process, make sure you have the following prerequisites in place:

    • Multiple Linux servers (nodes) running a compatible operating system (e.g., CentOS, Ubuntu, or Debian).
    • A reliable network connection between the nodes.
    • Root access or administrative privileges on each node.

    Step 1: Install GlusterFS

    The first step is to install GlusterFS on each node. Follow these steps:

    • Update your system’s package repository using the appropriate command for your Linux distribution (e.g., sudo apt update or sudo yum update).
    • Install GlusterFS using the package manager (e.g., sudo apt install glusterfs-server or sudo yum install glusterfs-server).
    • Start and enable the GlusterFS service (e.g., sudo systemctl start glusterd and sudo systemctl enable glusterd).

    Step 2: Set Up Peer Relationship

    To create a GlusterFS storage cluster, you need to establish peer relationships between the nodes. Follow these steps for each node:

    • Identify the IP addresses or hostnames of all the nodes.
    • Use the gluster peer probe command to connect each node to the others (e.g., sudo gluster peer probe <IP/hostname>).
    • Verify the peer status using sudo gluster peer status.

    Step 3: Create and Mount Gluster Volumes

    Once the peer relationships are established, you can create Gluster volumes for storing and accessing your data. Follow these steps:

    • Decide on a suitable volume type, such as replicated, distributed, striped, or distributed-replicated, based on your requirements.
    • Use the gluster volume create command to create a Gluster volume, specifying the volume type, the participating nodes, and the mount point (e.g., sudo gluster volume create <vol_name> <type> replica <N> <node1>:<brick_path1> ... <nodeN>:<brick_pathN>).
    • Start the Gluster volume using sudo gluster volume start <vol_name>.
    • Mount the Gluster volume on each node using the appropriate mount command (e.g., sudo mount -t glusterfs <node1>:<vol_name> <mount_point>).

    Step 4: Test and Verify the Configuration:

    To ensure that your GlusterFS configuration is working correctly, follow these steps:

    • Create a test file or directory on the mounted Gluster volume from any node.
    • Access the same file or directory from another node and verify that it is accessible and consistent across all nodes.
    • Perform read and write operations on the Gluster volume from different nodes to confirm that the data is synchronized.

    Step 5: Advanced Configuration (Optional)

    GlusterFS offers various advanced configuration options to optimize performance and enable additional features. Consider exploring options such as enabling client-side caching, enabling quota management, setting up geo-replication for data replication across different geographical locations, or integrating GlusterFS with other tools and services.

    Here’s an elaboration of each step with code example for configuring GlusterFS:

    Step 1: Install GlusterFS:

    # Update package repository
    sudo apt update
    
    # Install GlusterFS server package
    sudo apt install glusterfs-server
    
    # Start and enable GlusterFS service
    sudo systemctl start glusterd
    sudo systemctl enable glusterd

    Step 2: Set Up Peer Relationship:

    # Establish peer relationship between nodes
    sudo gluster peer probe <IP/hostname>
    
    # Verify peer status
    sudo gluster peer status
    

    Step 3: Create and Mount Gluster Volumes:

    # Create a replicated Gluster volume with two nodes
    sudo gluster volume create myvolume replica 2 node1:/data/brick1 node2:/data/brick1
    
    # Start the Gluster volume
    sudo gluster volume start myvolume
    
    # Mount the Gluster volume on each node
    sudo mount -t glusterfs node1:/myvolume /mnt/glusterfs
    sudo mount -t glusterfs node2:/myvolume /mnt/glusterfs

    Step 4: Test and Verify the Configuration:

    # Create a test file on the Gluster volume
    echo "Hello, GlusterFS!" | sudo tee /mnt/glusterfs/test.txt
    
    # Access the test file from another node
    sudo cat /mnt/glusterfs/test.txt
    
    # Perform read and write operations on the Gluster volume from different nodes
    echo "New content" | sudo tee -a /mnt/glusterfs/test.txt
    sudo cat /mnt/glusterfs/test.txt

    Step 5: Advanced Configuration (Optional):

    You can explore various advanced configuration options based on your requirements. Here are a few examples:

    • Enable client-side caching:
    sudo gluster volume set myvolume performance.cache-size 1GB
    sudo gluster volume set myvolume performance.cache-refresh-timeout 60
    • Enable quota management:
    sudo gluster volume quota myvolume enable
    sudo gluster volume quota myvolume limit-usage / 10GB
    • Set up geo-replication for data replication across different geographical locations:
    sudo gluster volume geo-replication myvolume user@remote:/remote-path create push-pem
    sudo gluster volume geo-replication myvolume user@remote:/remote-path start
    • Integrate GlusterFS with other tools and services (e.g., Samba, NFS, Kubernetes):
    # Example: Configure GlusterFS as a shared storage backend for Kubernetes
    # Install and configure GlusterFS Kubernetes plugin
    kubectl create -f https://raw.githubusercontent.com/gluster/gluster-kubernetes/master/deploy/1.17/glusterfs-daemonset/kubernetes/gk-deploy-1.17.yaml
    
    # Create a GlusterFS persistent volume
    kubectl create -f https://raw.githubusercontent.com/gluster/gluster-kubernetes/master/examples/1.17/glusterfs-end-to-end/pvc.yaml

    Conclusion

    By following this step-by-step guide and using the provided code samples, you have successfully configured GlusterFS for high-performance storage. You can further explore advanced configuration options and integrations to customize GlusterFS based on your specific needs. GlusterFS offers a scalable and flexible solution for managing your data effectively.

    db backup

    Effortlessly Take Daily MySQL Backups and Manage Old Files with a Shell Script

    Taking daily backups of your MySQL database is an essential task for ensuring data security and preventing data loss. In this blog, we’ll walk you through how to set up a shell script to take daily MySQL backups and delete older backup files more than one week old.

    Step 1: Creating the Backup Script

    To create the backup script, you need to open a text editor and enter the following code

    #!/bin/bash
    
    # Set the date format for the backup filename
    DATE=$(date +%Y-%m-%d)
    
    # Set the MySQL credentials
    MYSQL_USER="your_mysql_username"
    MYSQL_PASSWORD="your_mysql_password"
    
    # Set the directory for storing the backups
    BACKUP_DIR="/path/to/backup/folder"
    
    # Create the backup file
    BACKUP_FILE="$BACKUP_DIR/$DATE.sql"
    mysqldump --user=$MYSQL_USER --password=$MYSQL_PASSWORD --all-databases > $BACKUP_FILE
    
    # Delete backup files older than 7 days
    find $BACKUP_DIR/* -mtime +7 -exec rm {} \;
    

    In the code above, we first set the date format for the backup filename using the date command. Next, we set the MySQL credentials to be used by the script. You should replace “your_mysql_username” and “your_mysql_password” with the actual credentials for your MySQL server.

    We then set the directory for storing the backups using the BACKUP_DIR variable. You should replace “/path/to/backup/folder” with the actual path to the folder where you want to store the backups.

    We create the backup file using the mysqldump command. This command dumps all the databases to a file, which is named after the current date.

    Finally, we delete backup files older than 7 days using the find command. This command searches for files in the backup directory that are older than 7 days and deletes them.

    Step 2: Making the Script Executable

    Once you have created the backup script, you need to make it executable using the chmod command. Open the terminal and navigate to the directory where you saved the backup script. Then, enter the following command:

    chmod +x backup.sh
    

    This command makes the script executable.

    Step 3: Running the Backup Script

    To run the backup script, open the terminal and navigate to the directory where you saved the backup script. Then, enter the following command:

    ./backup.sh
    

    This command executes the backup script, and a new backup file is created in the backup directory.

    Step 4: Automating the Backup Process

    To automate the backup process, you can use a cron job to run the backup script at a specific time each day. To set up a cron job, open the terminal and enter the following command:

    crontab -e
    

    This command opens the cron table in the editor. Add the following line to the end of the file:

    0 0 * * * /path/to/backup.sh
    

    This line sets the backup script to run at midnight each day. Replace “/path/to/backup.sh” with the actual path to the backup script.

    Step 5: Verifying the Backup

    To verify that the backup is working correctly, you can check the backup directory for the presence of the backup file. You should see a new backup file for each day the script runs.

    Backup script for Cloud backup storage setups

    To update the backup script for remote backup storage setups, you can modify the backup directory to point to a remote storage location instead of a local folder. Here’s how you can modify the script:

    AWS Backup

    Step 1: Set up Remote Storage

    To set up remote storage, you can use services like Amazon S3, Google Cloud Storage, or any other cloud storage service that provides an API to upload files. You will need to create an account and set up the necessary credentials to access the remote storage.

    Step 2: Install and Configure the AWS CLI

    If you are using Amazon S3 for remote storage, you will need to install and configure the AWS CLI on the server where the backup script runs. You can follow the official AWS documentation to install and configure the CLI.

    Step 3: Modify the Backup Script

    To modify the backup script, you need to change the backup directory to the remote storage location. Here’s an example of how you can modify the script to upload the backup file to an S3 bucket:

    #!/bin/bash
    
    # Set the date format for the backup filename
    DATE=$(date +%Y-%m-%d)
    
    # Set the MySQL credentials
    MYSQL_USER="your_mysql_username"
    MYSQL_PASSWORD="your_mysql_password"
    
    # Set the directory for storing the backups
    BACKUP_DIR="/path/to/local/folder"
    
    # Create the backup file
    BACKUP_FILE="$BACKUP_DIR/$DATE.sql"
    mysqldump --user=$MYSQL_USER --password=$MYSQL_PASSWORD --all-databases > $BACKUP_FILE
    
    # Upload backup file to S3
    aws s3 cp $BACKUP_FILE s3://your-bucket-name/$DATE.sql
    
    # Delete backup files older than 7 days
    find $BACKUP_DIR/* -mtime +7 -exec rm {} \;
    

    In the code above, we added the AWS CLI command aws s3 cp to upload the backup file to the S3 bucket. Replace “your-bucket-name” with the actual name of the S3 bucket where you want to store the backup file.

    Step 4: Test the Backup Script

    To test the backup script, you can run the script manually and verify that the backup file is uploaded to the remote storage location.

    Step 5: Automate the Backup Process

    To automate the backup process, you can set up a cron job to run the backup script at a specific time each day, as described in the previous section.

    Remote server instead of a local folder or remote storage

    To update the backup script for a remote backup server, you need to modify the script to copy the backup file to the remote server instead of a local folder or remote storage. Here’s how you can modify the script:

    Remote Backup

    Step 1: Set up Remote Backup Server

    To set up a remote backup server, you need to have access to a remote server with SSH enabled. You will also need to create a backup directory on the remote server and set up the necessary credentials to access the server.

    Step 2: Modify the Backup Script

    To modify the backup script, you need to add an SCP command to copy the backup file to the remote server. Here’s an example of how you can modify the script to copy the backup file to a remote server:

    #!/bin/bash
    
    # Set the date format for the backup filename
    DATE=$(date +%Y-%m-%d)
    
    # Set the MySQL credentials
    MYSQL_USER="your_mysql_username"
    MYSQL_PASSWORD="your_mysql_password"
    
    # Set the directory for storing the backups
    BACKUP_DIR="/path/to/local/folder"
    
    # Create the backup file
    BACKUP_FILE="$BACKUP_DIR/$DATE.sql"
    mysqldump --user=$MYSQL_USER --password=$MYSQL_PASSWORD --all-databases > $BACKUP_FILE
    
    # Copy backup file to remote server
    REMOTE_SERVER="your_remote_server_address"
    REMOTE_DIR="/path/to/remote/folder"
    scp $BACKUP_FILE $REMOTE_SERVER:$REMOTE_DIR
    
    # Delete backup files older than 7 days
    find $BACKUP_DIR/* -mtime +7 -exec rm {} \;
    

    In the code above, we added the SCP command scp to copy the backup file to the remote server. Replace “your_remote_server_address” with the actual IP address or domain name of the remote server where you want to store the backup file. Replace “/path/to/remote/folder” with the actual directory on the remote server where you want to store the backup file.

    Step 3: Test the Backup Script

    To test the backup script, you can run the script manually and verify that the backup file is copied to the remote server.

    Step 4: Automate the Backup Process

    To automate the backup process, you can set up a cron job to run the backup script at a specific time each day, as described in the previous section.

    Conclusion

    By modifying the backup script to copy the backup file to a remote server, you can ensure that your data is protected in case of local hardware failure or disaster. With the SCP command and remote server access, it’s easy to set up a secure and reliable backup process for your MySQL database.

    lamp

    How to Install LAMP with Latest Version of PHP on RHEL: A Step-by-Step Guide 2023

    Lamp

    If you’re looking to set up a web server on your RHEL (Red Hat Enterprise Linux) system, you’ll need to install a stack of software called LAMP, which stands for Linux, Apache, MySQL, and PHP. This blog will guide you through the process of installing LAMP with the latest version of PHP on RHEL.

    Step 1: Update the system

    Before you start installing anything, make sure your system is up-to-date. To do this, run the following command:

    sudo yum update

    This will update all the packages on your system to the latest versions.

    Step 2: Install Apache

    Apache is a widely used web server that will allow your system to serve web pages. To install Apache, run the following command:

    sudo yum install httpd

    Once the installation is complete, start the Apache service and enable it to start automatically at boot time:

    sudo systemctl start httpd.service
    sudo systemctl enable httpd.service

    Step 3: Install MySQL

    MySQL is a popular open-source database management system. To install MySQL, run the following command:

    sudo yum install mysql-server

    Once the installation is complete, start the MySQL service and enable it to start automatically at boot time:

    sudo systemctl start mysqld.service
    sudo systemctl enable mysqld.service

    During the installation process, you will be prompted to set a root password for MySQL. Make sure you remember this password as it will be required later.

    Step 4: Install the latest version of PHP

    The default version of PHP that comes with RHEL may not be the latest version available. To install the latest version of PHP, you’ll need to enable the Remi repository, which contains the latest versions of PHP.

    First, install the Remi repository:

    sudo yum install http://rpms.remirepo.net/enterprise/remi-release-8.rpm

    Once the repository is installed, enable the latest version of PHP:

    sudo yum module reset php
    
    sudo yum module enable php:remi-8.1

    Finally, install PHP and its required extensions:

    sudo yum install php php-cli php-fpm php-mysqlnd php-zip php-devel php-gd php-mcrypt php-mbstring php-curl php-xml php-pear php-bcmath

    Step 5: Restart the Apache service

    To load the new version of PHP, restart the Apache service:

    sudo systemctl restart httpd.service

    Step 6: Verify the installation

    To verify that LAMP with the latest version of PHP has been installed correctly, create a PHP test script by running the following command:

    sudo nano /var/www/html/info.php

    This will open a new file in the nano text editor. Enter the following code into the file:

    <?php
    phpinfo();
    ?>

    Save the file and close the text editor.

    Now open a web browser and enter the IP address of your RHEL system followed by “/info.php” in the address bar. For example, if your RHEL system’s IP address is 192.168.1.100, enter “http://192.168.1.100/info.php” in the address bar. You should see a page containing information about your PHP installation, including the version number.

    Step 7: Secure the installation

    By default, the LAMP installation is not very secure. To improve the security of your installation, run the following command:

    sudo mysql_secure_installation

    This command will prompt you to configure the MySQL root password, remove anonymous users, disallow remote root login, and remove the test database. Follow the prompts to secure your MySQL installation.

    Conclusion

    In this blog, we have shown you how to install LAMP on RHEL. With this installation, you now have a powerful web server that can serve dynamic web pages and store data in a database. Remember to keep your system up-to-date and secure to prevent any potential security threats.

    mysql replica

    Step-by-Step Guide to Setting up MySQL Master-Slave Replication

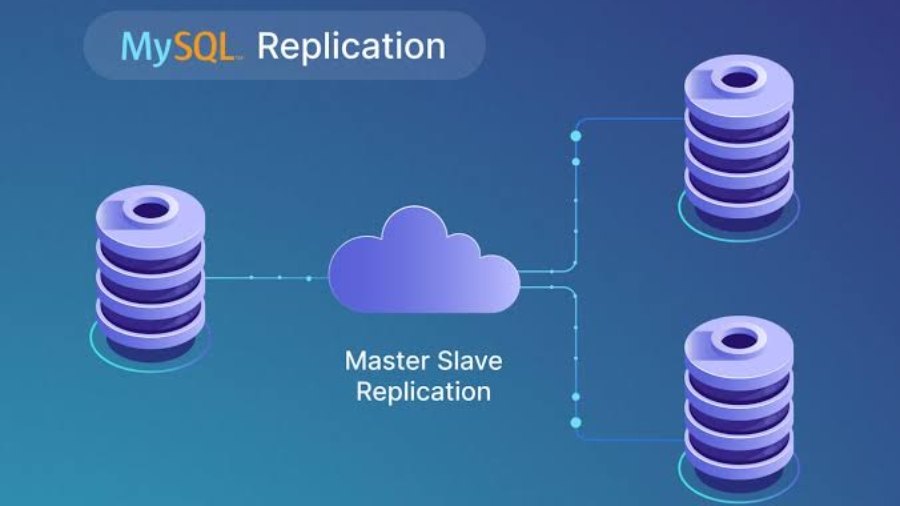
    MySQL is one of the most widely used relational database management systems. It offers several features and options to manage data efficiently. One such feature is MySQL Master-Slave replication, which is used to copy data from a master database to one or more slave databases. In this blog, we will discuss how to configure MySQL Master-Slave replication with detailed explanations and commands.

    Mysql Replication

    Master-Slave Replication

    Master-Slave replication is a method of copying data from a master MySQL database to one or more slave databases. It is used to improve the availability and scalability of MySQL databases. The master database is responsible for writing changes to the database, and the slave databases copy those changes. Slave databases can be used for backup, read-only queries, load balancing, or reporting.

    MySQL Master-Slave Replication Configuration

    To configure MySQL Master-Slave replication, we need to follow these steps:

    Step 1: Setting up the Master Database

    The first step is to set up the master database. To do this, we need to perform the following steps:

    1. Install MySQL: Install MySQL on the server that will be the master database. We can use the following command to install MySQL on Ubuntu:
    sudo apt-get install mysql-server
    1. Configure MySQL: Once MySQL is installed, we need to configure it by editing the MySQL configuration file. Open the MySQL configuration file with the following command:
    sudo nano /etc/mysql/mysql.conf.d/mysqld.cnf

    Add the following lines to the end of the file to enable binary logging:

    log_bin = /var/log/mysql/mysql-bin.log
    server_id = 1

    Save and close the file.

    1. Restart MySQL: After editing the MySQL configuration file, we need to restart MySQL with the following command:
    sudo systemctl restart mysql
    1. Create a Replication User: We need to create a user that the slave database will use to connect to the master database. To create a replication user, run the following command:
    GRANT REPLICATION SLAVE ON *.* TO 'repl_user'@'%' IDENTIFIED BY 'password';

    Note: Replace ‘repl_user’ and ‘password’ with the desired username and password.

    1. Take a Snapshot: Finally, we need to take a snapshot of the master database to use as a starting point for the slave databases. To take a snapshot, use the following command:
    mysqldump --single-transaction --master-data=1 --ignore-table=mysql.event dbname > dbname.sql

    Note: Replace ‘dbname’ with the name of the database.

    Step 2: Setting up the Slave Database

    After setting up the master database, we need to set up the slave database. To do this, we need to perform the following steps:

    1. Install MySQL: Install MySQL on the server that will be the slave database. We can use the following command to install MySQL on Ubuntu:
    sudo apt-get install mysql-server
    1. Configure MySQL: Once MySQL is installed, we need to configure it by editing the MySQL configuration file. Open the MySQL configuration file with the following command:
    sudo nano /etc/mysql/mysql.conf.d/mysqld.cnf

    Add the following lines to the end of the file to enable replication:

    server_id = 2
    relay_log = /var/log/mysql/mysql-relay-bin.log
    relay_log_index = /var/log/mysql/mysql-relay-bin.index
    log_slave_updates = 1

    Save and close the file.

    1. Restart MySQL: After editing the MySQL configuration file, we need to restart MySQL with the following command:
    sudo systemctl restart mysql
    Connect to the Master Database: We need to connect to the master database and get the binary log file name and position to use as a starting point for the slave database. To do this, run the following command on the master database:
    
    SHOW MASTER STATUS;
    Note the binary log file name and position.
    
    Set up Replication on the Slave Database: We need to set up replication on the slave database using the binary log file name and position from the master database. Run the following command on the slave database:
    makefile
    
    CHANGE MASTER TO
    MASTER_HOST='master_host_ip',
    MASTER_USER='repl_user',
    MASTER_PASSWORD='password',
    MASTER_LOG_FILE='mysql-bin.000001',
    MASTER_LOG_POS=501;
    
    Note: Replace 'master_host_ip', 'repl_user', 'password', 'mysql-bin.000001', and '501' with the appropriate values.
    
    Start Replication on the Slave Database: Finally, we need to start replication on the slave database with the following command:
    
    SHOW SLAVE STATUS\G

    To check the replication status, run the following command:

    SHOW SLAVE STATUS\G

    This will show the replication status and information on the slave database.

    Conclusion

    In this blog, we discussed how to configure MySQL Master-Slave replication with detailed explanations and commands. Master-Slave replication is a powerful feature of MySQL that can be used to improve the availability and scalability of MySQL databases. By following the steps outlined in this blog, you should be able to successfully set up MySQL Master-Slave replication.

    Linux_file_system

    Linux File Systems and Directory Structures

    If you’re new to Linux, the file system and directory structure can be daunting. However, it’s important to understand these concepts to effectively manage files and directories on your system. In this article, we’ll explain the Linux file systems and directory structures in detail, including the different types of file systems and the most important directories.

    Table of Contents:

    1. Introduction
    2. Linux File Systems
    3. Inodes and File Allocation
    4. Types of File Systems a. ext4 b. Btrfs c. XFS d. JFS
    5. Linux Directory Structure
    6. Root Directory
    7. Subdirectories
      • a. /bin
      • b. /boot
      • c. /dev
      • d. /etc
      • e. /home
      • f. /lib
      • g. /mnt
      • h. /proc
      • i. /usr
      • j. /var
    8. Conclusion
    9. Introduction:

    The Linux file system and directory structure are organized in a hierarchical tree structure, with the root directory at the top. The file system is responsible for storing and organizing files and directories, while the directory structure provides a logical organization of the files and directories.

    1. Linux File Systems:

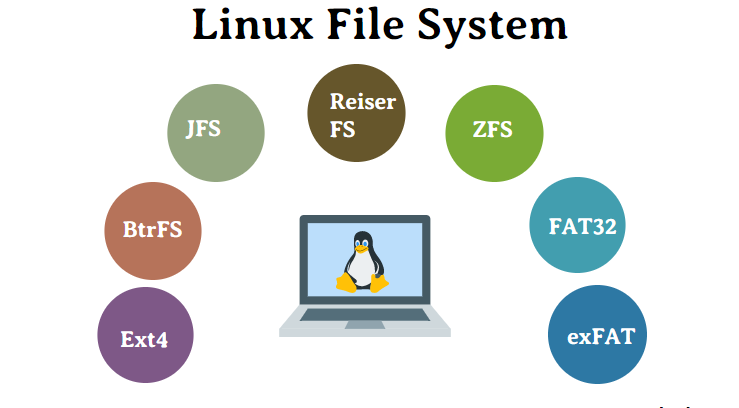
    The most commonly used file system in Linux is the ext4 file system, known for its stability and performance. However, other file systems such as Btrfs, XFS, and JFS are also used in Linux, each with its own set of rules for organizing and accessing files and directories.

    1. Inodes and File Allocation:

    The ext4 file system uses an inode-based system to keep track of files and directories. Inodes are data structures that contain information about files and directories, including ownership, permissions, and location on the hard drive. The file allocation table (FAT) is used to map the file system blocks to the inodes.

    1. Types of File Systems:
    Linux File Systems

    a. ext4:

    The ext4 file system is the default file system in many Linux distributions. It’s known for its reliability and performance, with support for large file systems and up to 16 terabytes of data.

    b. Btrfs:

    Btrfs is a modern file system designed to provide improved data management and reliability. It uses a copy-on-write system to optimize data management and provides features such as snapshotting and compression.

    c. XFS:

    XFS is a high-performance file system designed for use with large files and high-speed networks. It provides support for large file systems and high-speed file transfers.

    d. JFS:

    JFS is a file system developed by IBM and designed for use with high-performance computers. It provides support for large file systems and can handle high-speed file transfers.

    1. Linux Directory Structure:

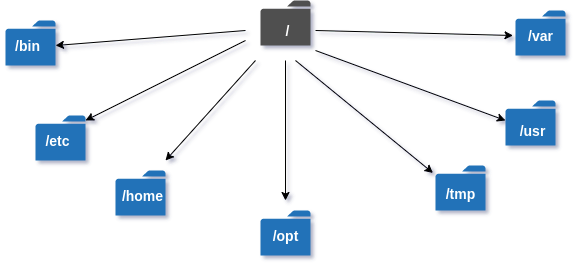
    The Linux directory structure is organized in a hierarchical tree structure, with the root directory at the top. All other directories are subdirectories of the root directory.

    Linux Directory Structure
    1. Root Directory:

    The root directory is denoted by a forward slash (/) and is the top-level directory in the Linux file system. It contains all other directories and files on the system.

    a. /bin:

    The /bin directory contains essential user binaries (executable programs) that are required during booting, repairing, and single-user mode operations. These binaries are available to all users and are usually stored in the system’s root file system.

    Some of the important binaries found in the /bin directory include commands like cat, ls, cp, mv, mkdir, rmdir, etc.

    b. /boot:

    The /boot directory contains files required for booting the system, including the kernel, initial ramdisk, and bootloader configuration files.

    The kernel is the core component of the operating system that manages system resources and communicates with the hardware. The initial ramdisk (initrd) is a temporary file system that contains essential system files and drivers required to boot the system. The bootloader configuration files are used to configure the bootloader, which is responsible for loading the kernel and initrd files during the boot process.

    c. /dev:

    The /dev directory contains device files that represent hardware devices connected to the system, such as disks, partitions, printers, and network interfaces.

    Device files are special files that provide an interface for user applications to communicate with the hardware devices. For example, the device file /dev/sda represents the first disk on the system, and applications can read and write to this file to access the disk’s contents.

    d. /etc:

    The /etc directory contains configuration files for the system and applications installed on it. These files are usually plain text files and are editable by the system administrator. The /etc directory is an important directory as it contains many critical system configuration files, including /etc/passwd, /etc/group, /etc/fstab, /etc/hosts, and /etc/resolv.conf.

    e. /home:

    The /home directory contains the home directories for all user accounts on the system. Each user has their own subdirectory in /home, which is used to store their personal files and settings.

    f. /lib:

    The /lib directory contains essential shared libraries used by system utilities and programs. These libraries contain code that is used by multiple programs, which helps to reduce duplication and improve system performance.

    g. /mnt:

    The /mnt directory is used as a mount point for temporary file systems, such as CD-ROMs and USB drives. When a removable device is connected to the system, it can be mounted to the /mnt directory using the mount command.

    h. /proc:

    The /proc directory contains information about running processes and system resources, presented as files and directories. The files in the /proc directory are not actual files, but rather a representation of system information maintained by the kernel.

    i. /usr:

    The /usr directory contains user binaries, libraries, documentation, and source code for installed software packages. This directory is typically read-only and contains files that are shared among multiple users.

    j. /var:

    The /var directory contains variable data, including system logs, mail, and print spools. This directory is used to store data that changes frequently during the system’s operation. It is important to monitor the usage of the /var directory, as it can quickly fill up if logs and other data are not periodically purged.

    1. Conclusion:

    Understanding the Linux file system and directory structure is essential for managing files and directories on a Linux system. By learning about the different types of file systems and directories, you’ll be able to effectively organize and manage your files and directories. We hope this article has provided you with a better understanding of these concepts and how they work in Linux.

    In conclusion, Linux file systems and directory structures can be complex, but they are essential to effectively manage files and directories on a Linux system. By understanding the different types of file systems and directories, you’ll be able to better navigate and manage your files and directories.

    images

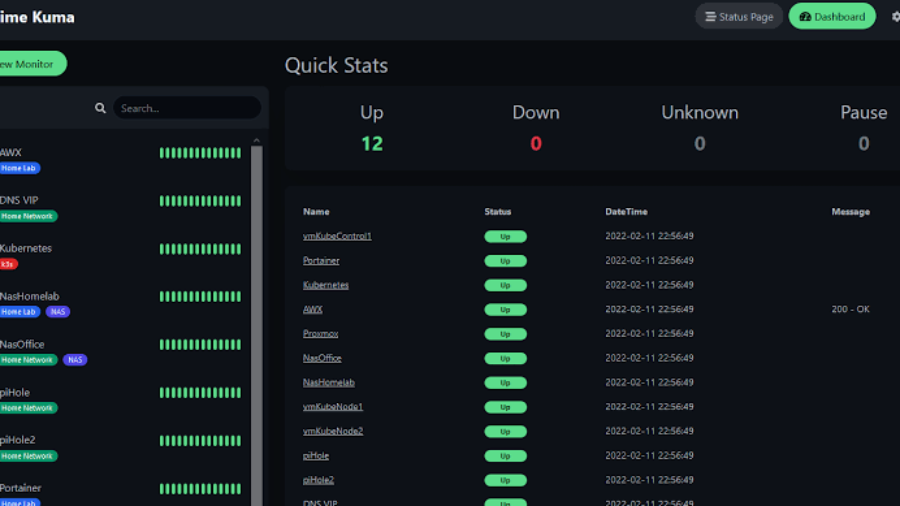
    Uptimekuma : How to install and configure uptimekuma?

    UptimeKuma is an open-source, self-hosted service that provides website and server monitoring. Here are the general steps to install and configure UptimeKuma on a Linux server:

    1. Install the necessary dependencies: UptimeKuma requires Node.js, npm, and MongoDB to be installed on the server. Install them using the package manager of your Linux distribution.
    2. Download and extract the UptimeKuma source code: Download the latest release of UptimeKuma from the official GitHub repository and extract the files to a directory on your server.
    3. Install the Node.js dependencies: Navigate to the UptimeKuma directory and install the required Node.js dependencies by running the following command: npm install
    4. Configure UptimeKuma: Copy the sample configuration file config.sample.js to config.js and edit it to suit your needs. The most important configuration options are the MongoDB connection settings and the email notification settings.
    5. Start UptimeKuma: Run the command npm start to start the UptimeKuma service. By default, it will listen on port 3000.
    6. Set up a reverse proxy: If you want to access UptimeKuma from the internet, it is recommended to set up a reverse proxy with SSL termination. You can use a web server such as Nginx or Apache to achieve this.
    7. Create an admin user: To access the UptimeKuma web interface, you need to create an admin user. Run the command npm run add-admin and follow the prompts to create an admin user account.

    Once you have completed these steps, you can access the UptimeKuma web interface by navigating to the URL of your server, followed by the port number (e.g. http://example.com:3000). From there, you can add website and server monitors, view status reports, and configure notification settings.

    gabriel-heinzer-4Mw7nkQDByk-unsplash

    What are the 100 most common linux commands and its use?

    Here are 100 commonly used Linux commands and a brief explanation of their usage:

    ls – lists the contents of a directory
    cd – changes the current working directory
    pwd – displays the current working directory
    mkdir – creates a new directory
    rmdir – removes a directory
    touch – creates a new empty file
    rm – removes a file or directory
    cp – copies files or directories
    mv – moves or renames files or directories
    cat – displays the contents of a file
    less – displays the contents of a file one page at a time
    grep – searches for a pattern in a file
    find – searches for files in a directory hierarchy
    chmod – changes the permissions of a file or directory
    chown – changes the ownership of a file or directory
    ps – displays information about running processes
    top – displays real-time information about system performance
    kill – sends a signal to terminate a process
    tar – creates or extracts compressed archives
    gzip – compresses or decompresses files
    gunzip – decompresses gzip files
    ping – tests network connectivity
    ifconfig – displays network interface configuration
    netstat – displays network connections and statistics
    route – displays or modifies network routing tables
    ssh – connects to a remote system using the Secure Shell protocol
    scp – copies files between systems using the Secure Copy protocol
    rsync – synchronizes files between systems
    wget – downloads files from the web
    curl – transfers data from or to a server
    uname – displays information about the system
    date – displays or sets the system date and time
    cal – displays a calendar
    whoami – displays the current user
    su – switches to the root user or another user account
    sudo – executes a command with elevated privileges
    passwd – changes the user password
    history – displays the command history
    alias – creates a shortcut for a command
    echo – displays text on the screen
    tee – reads from standard input and writes to standard output and files
    wc – displays the number of lines, words, and characters in a file
    sort – sorts lines in a file
    uniq – removes duplicate lines from a file
    cut – extracts fields from a file
    sed – performs text transformations on a file
    awk – processes and manipulates text files
    diff – compares two files or directories
    patch – applies a patch to a file
    tar – creates or extracts compressed archives
    gzip – compresses or decompresses files
    gunzip – decompresses gzip files
    zcat – displays the contents of a compressed file
    tail – displays the last lines of a file
    head – displays the first lines of a file
    tr – translates characters in a file
    xargs – reads items from standard input and executes a command with them
    cut – extracts fields from a file
    paste – combines lines from multiple files
    df – displays disk usage statistics
    du – displays disk usage for a file or directory
    mount – mounts a file system
    umount – unmounts a file system
    free – displays memory usage statistics

    top – displays real-time information about system performance

    ps – displays information about running processes